Importance of RV Maintenance
Regular maintenance of an RV is critical to its longevity and performance. An RV is not just a vehicle; it’s a home on wheels, subject to the wear and tear of both travel and living conditions. Proper maintenance, including fiberglass replacement when necessary, helps to prevent minor issues from escalating into major problems, ensuring the safety and comfort of the occupants.
Benefits of Fiberglass Replacement
Replacing damaged fiberglass on an RV offers several benefits. It restores the vehicle’s appearance, improves its structural integrity, and can even enhance resale value. Additionally, addressing fiberglass damage promptly can prevent more extensive and costly repairs down the line. Investing in fiberglass replacement is an investment in the long-term health and value of your RV.
Understanding RV Fiberglass
What is RV Fiberglass?
RV fiberglass is a composite material made from fine fibers of glass embedded in a resin matrix. This combination results in a durable, lightweight, and weather-resistant material ideal for the exterior of recreational vehicles. Fiberglass panels are commonly used for RV roofs, walls, and other exterior components.
Properties of RV Fiberglass
Fiberglass boasts several properties that make it suitable for RV construction:
- Durability: It can withstand impacts and harsh weather conditions.
- Lightweight: Reduces the overall weight of the RV, improving fuel efficiency.
- Flexibility: This can be molded into various shapes and sizes, allowing for customizable RV designs.
- Resistance to Corrosion: Unlike metal, fiberglass does not rust, making it ideal for long-term use.
Advantages of Fiberglass over Other Materials
Fiberglass offers numerous advantages compared to other materials used in RV construction, such as aluminum or wood:
- Longer Lifespan: Fiberglass panels tend to last longer than aluminum or wood.
- Better Insulation: Provides superior insulation properties, keeping the RV interior comfortable in different weather conditions.
- Aesthetic Appeal: Fiberglass can be finished with a smooth, glossy surface that enhances the RV’s appearance.
Types of RV Fiberglass Damage
Common Causes of Damage
Environmental Factors
Exposure to harsh environmental conditions can lead to fiberglass damage. UV rays from the sun can cause the material to degrade over time, while moisture and temperature fluctuations can lead to expansion and contraction, resulting in cracks and delamination.
Accidents and Collisions
Accidents, such as hitting low-hanging branches or minor collisions, can cause significant damage to the fiberglass exterior. Even small impacts can lead to cracks and holes that require attention.
Wear and Tear
Regular use and the passage of time contribute to the natural wear and tear of RV fiberglass. Small scratches and dings can accumulate, eventually leading to more significant issues if not addressed promptly.
Types of Damage
Cracks and Holes
Cracks and holes are common forms of damage in RV fiberglass. These can occur from impacts or stress on the material. Small cracks can expand over time, leading to more extensive damage if not repaired.
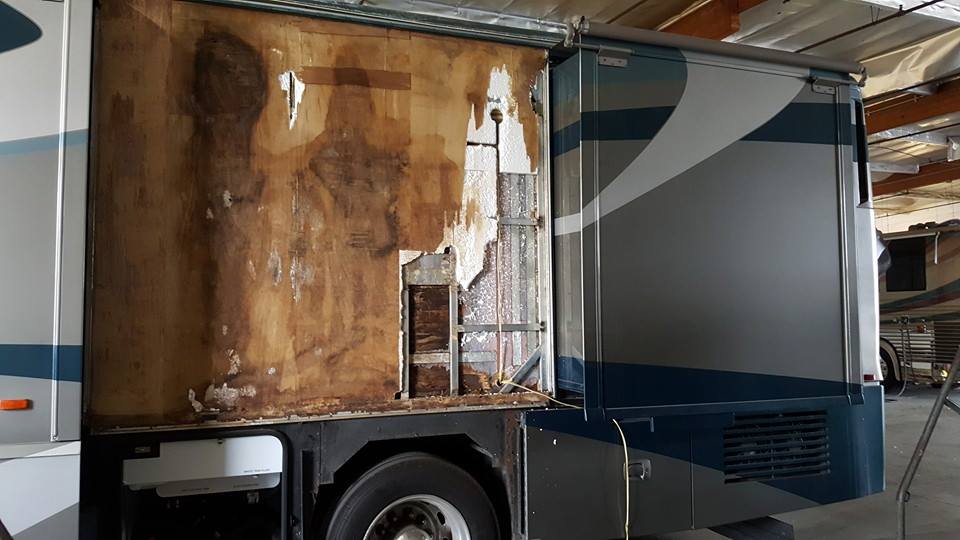
Delamination
Delamination occurs when the layers of fiberglass and resin begin to separate, often due to prolonged exposure to moisture. This can compromise the structural integrity of the RV and requires prompt attention.
Gelcoat Damage
The gel coat is the outermost layer of the fiberglass that provides a smooth and glossy finish. Damage to the gel coat, such as scratches or discoloration, not only affects the appearance but can also expose the underlying fiberglass to further damage.
Assessing the Damage
Initial Inspection
Before beginning any repair, it’s essential to conduct a thorough inspection of the damaged area. Look for visible cracks, holes, and signs of delamination. Note the extent of the damage and any potential underlying issues.
Professional Assessment
For a more comprehensive evaluation, consider seeking a professional assessment. RV repair specialists can provide a detailed analysis of the damage and recommend the best course of action. They can also identify any hidden issues that might not be apparent during a surface inspection.
Cost Estimation
Once the damage has been assessed, the next step is to estimate the cost of repairs. This includes the cost of materials, labor, and any additional expenses that may arise. Having a clear understanding of the costs involved helps in budgeting and planning for the repair process.
Preparation for Fiberglass Replacement
Tools and Materials Needed
Gathering the right tools and materials is crucial for a successful fiberglass replacement. Commonly required items include:
- Fiberglass sheets
- Resin and hardener
- Sandpaper and sanding blocks
- Safety equipment (gloves, goggles, respirator)
- Cutting tools (saws, utility knives)
- Brushes and rollers for applying resin
Safety Precautions
Safety should be a top priority when working with fiberglass. Wear protective clothing, gloves, and goggles to prevent skin and eye irritation. Use a respirator to avoid inhaling harmful fumes from the resin and other chemicals.
Setting Up the Work Area
Prepare a clean and well-ventilated work area. Lay down protective sheets to catch any debris and ensure you have adequate lighting. Having an organized workspace helps in completing the job efficiently and safely.
Step-by-Step Fiberglass Replacement Process
Removing Damaged Fiberglass
Identifying the Area
Start by clearly marking the area of damaged fiberglass that needs to be removed. Ensure the markings are precise to avoid removing more material than necessary.
Cutting Out the Damage
Using appropriate cutting tools, carefully cut out the damaged section of fiberglass. Take your time to ensure clean and accurate cuts, which will make the replacement process smoother.
Preparing the Surface
Cleaning the Area
Thoroughly clean the area where the new fiberglass will be applied. Remove any dirt, debris, and remnants of the old fiberglass to create a smooth surface for the new material.
Sanding and Smoothing
Sand the edges of the cut-out area to smooth them out. This helps in creating a seamless bond between the old and new fiberglass. Use sandpaper or a sanding block to achieve a smooth finish.
Applying New Fiberglass
Cutting Fiberglass Sheets
Cut the fiberglass sheets to the appropriate size and shape needed to cover the damaged area. Ensure the pieces are slightly larger than the cut-out section to allow for trimming and adjustments.
Mixing and Applying Resin
Mix the resin and hardener according to the manufacturer’s instructions. Apply a layer of resin to the prepared surface and place the fiberglass sheets over it. Use brushes and rollers to ensure the sheets are firmly attached and free of air bubbles.
Curing and Finishing
Allowing Proper Curing Time
Allow the resin to cure according to the recommended time. Curing times can vary based on the type of resin and environmental conditions, so follow the manufacturer’s guidelines closely.
Sanding and Painting
Once the resin has fully cured, sand the repaired area to achieve a smooth and even surface. Apply a coat of paint or gel coat to match the rest of the RV’s exterior, restoring its original appearance.
Post-Replacement Care and Maintenance
Inspecting the Repair
After completing the fiberglass replacement, inspect the repaired area thoroughly. Look for any imperfections or signs of weakness that may need further attention. Ensuring the repair is done correctly helps in maintaining the integrity of the RV.
Routine Maintenance Tips
Regular maintenance is essential to keep the fiberglass in good condition. Clean the exterior regularly, inspect for any signs of damage, and address minor issues promptly to prevent them from becoming major problems.
Preventive Measures to Avoid Future Damage
Implement preventive measures to protect the fiberglass from future damage. This includes using RV covers, parking in shaded areas to minimize UV exposure, and avoiding contact with low-hanging branches or obstacles.
Case Studies and Real-life Examples
Successful Fiberglass Replacements
Sharing examples of successful fiberglass replacements can provide valuable insights and inspiration. These case studies highlight the effectiveness of proper repair techniques and the benefits of timely intervention.
Lessons Learned from Failed Repairs
Learning from failed repairs is equally important. Understanding common mistakes and pitfalls helps in avoiding similar issues in the future. Analyze what went wrong and how it could have been prevented to improve repair practices.
Expert Insights and Tips
Advice from RV Repair Professionals
Gathering advice from experienced RV repair professionals can be invaluable. They can provide practical tips, recommend the best tools and materials, and offer insights into the most effective repair techniques.
Common Mistakes to Avoid
Highlighting common mistakes in fiberglass replacement can help DIY enthusiasts avoid them. This includes using incorrect materials, inadequate surface preparation, and rushing the curing process.
Recommended Products and Brands
Listing recommended products and brands for fiberglass repair can guide RV owners in selecting high-quality materials. Professional endorsements add credibility and ensure the use of reliable products.
Frequently Asked Questions (FAQs)
How Long Does Fiberglass Replacement Take?
The duration of a fiberglass replacement project depends on the extent of the damage and the complexity of the repair. On average, it can take anywhere from a few days to a couple of weeks to complete the process, including curing time.
Can I Do Fiberglass Replacement Myself?
Yes, fiberglass replacement can be a DIY project if you have the right tools, materials, and knowledge. However, for extensive damage or if you’re unsure about the process, it’s advisable to seek professional help to ensure a high-quality repair.
How Much Does Fiberglass Replacement Cost?
The cost of fiberglass replacement varies based on factors such as the size of the damaged area, the materials used, and labor charges if you hire a professional. On average, it can range from a few hundred to several thousand dollars.
What Are the Signs That My RV Needs Fiberglass Replacement?
Signs that your RV needs fiberglass replacement include visible cracks, holes, delamination, and gel coat damage. If you notice any of these issues, it’s essential to address them promptly to prevent further deterioration.
Is Fiberglass Replacement Covered by Insurance?
Whether fiberglass replacement is covered by insurance depends on your policy and the cause of the damage. It’s advisable to check with your insurance provider to understand the coverage and any potential claims you can make.
Conclusion
RV fiberglass replacement is a crucial aspect of maintaining your recreational vehicle. Understanding the process, from identifying damage to completing the repair, ensures your RV remains in excellent condition.