Does your wifi connection drop in certain areas of your abode? Is your office plagued with wifi dead spots? If yes then Wavlink wifi repeater setup can help you out. Because this signal repeater will not only extend the wifi coverage but will also strengthen the connectivity in every single nook. It makes your connection much more reliable and dependable. So next time whenever you have an important meeting you need not sit in a specific area rather you can easily choose the spot. But for this you must conduct the errorless setup. This guide will provide you step by step guidance for the same and not one but two methods. So without further stalling, let’s unveil the installation steps.
Quick Start Method
The simplest way to complete your Wavlink wifi repeater setup is by using the WPS (Wi-Fi Protected Setup) feature. This method is fast. It requires no web browser configuration, no smart device or any other component. Just your router must feature the WPS button.
- Start the setup by bringing the repeater close to the router.
- Now take the power wire. Slide its power pin into the repeater’s power port and with that plug the adapter into the electrical outlet. Switch on the power.
- Let the repeater complete its booting process. For this it will take up a few moments. Once the booting is complete, you’ll see a stable green/blue light on the extender.
- Next push the WPS key of the router and within the time span of 120 seconds activate the repeater’s WPS feature as well.
- Now you’ll notice the WPS indicators are continuously going back and forth. This means the sync is under progress. So the Wavlink wifi repeater setup using WPS completes only when the WPS indicators turn all glowy and stable.
- At last, you have to reposition the repeater. Bring it to the center of the router and the spot with wifi problems. Once the deployment is done, repower the repeater and wait for the WPS light to turn stable. Now pair the device and test the connection. You can adjust the positioning for better connectivity.
Manual Setup Method
If your router doesn’t have a WPS button or if the WPS method fails then you can use the web browser method. This is a very common and reliable way to perform the Wavlink wifi repeater setup. The steps for it are as follows:
- Plug the repeater in between the router and the plagued area.
- Thereafter power it on and let the power indicator turn stable.
- Up next take your laptop. Visit its settings and enable wifi. Now pair up with the repeater’s default network. The exact network name is written on the repeater’s product label.
- You can also simplify the above written pairing method by just using the ethernet wire.
- Once the pairing is successful, open chrome or any other internet browser which is compatible and up-to-date.
Thereafter, in the URL blank type wifi.wavlink.com and push the enter key. If for Wavlink wifi repeater setup the web address doesn’t work then use the IP address instead. It is 192.168.10.1. - Now the login window becomes accessible and this page asks you about the login password. So fill it up. It is “admin” in lower letter case. Then after choosing the language hit on Login.
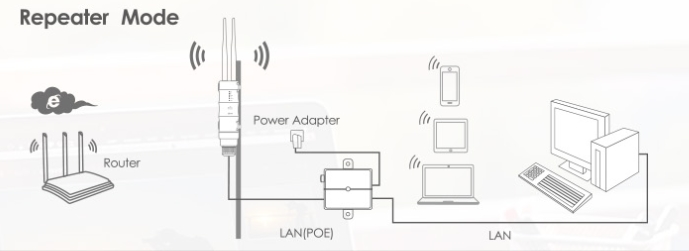
- Finally the main setup page pops up. It asks you to choose the setup mode. Select repeater mode. Then it will scan for the available networks. You have to select your router’s identity. With that, fill in the password and customize the network details. As all of this is done click on Apply.
- Now the wifi repeater will go into the rebooting zone. So let it finish that and again show up solid light. At last, link your device to the repeater’s network that you just personalized and review the connection. You’ll surely have uninterrupted and errorless connectivity throughout.
Wrapping Up!
The Wavlink wifi repeater setup is simple and easy. But sometimes the user conducts the installation without learning about the accurate steps. Thus the setup fails. So in that scenario the factory resetting of the wifi repeater becomes crucial. So here’s how you can reset the extender: Power on the repeater. Let it boot up. Press the reset button and hold it for about 8 to 10 seconds. On release the extender will reset and you can redo the setup by following the above written accurate guidance. Make sure you do the resetting of the extender only in extreme conditions. Because frequently doing the same can affect the internal hardware of the repeater.
If you still have concerns regarding Wavlink wifi repeater setup then feel free to call, mail or chat with the experts.