When it comes to home decor, lighting is one of the most impactful elements. A well-chosen light fixture can transform the ambiance of a room, making it feel cozy, welcoming, or even sophisticated. Among the various lighting options available, DIY pendant lights stand out for their versatility and ease of installation. At Snap Lighting, we offer a wide range of plug-in pendant lights designed to be installed by you—no electrician needed! In this blog post, we’ll explore the benefits of DIY pendant lights, how to choose the right one, and a simple step-by-step guide to installing your new lighting fixture.
Why Choose DIY Pendant Lights?
1. Easy Installation
One of the primary reasons DIY pendant lights are gaining popularity is their straightforward installation process. Unlike traditional light fixtures that may require hardwiring and the assistance of an electrician, our plug-in pendant lights are designed for easy DIY setup. You can replace your existing downlights with pendant lights in just three simple steps, saving you both time and money.
2. Cost-Effective Solution
Upgrading your home’s lighting doesn’t have to break the bank. By opting for DIY pendant lights, you avoid the high costs associated with professional installation. This not only saves you money but also allows you to invest in higher-quality light fixtures that enhance your home’s aesthetic.
3. Versatile Design Options
DIY pendant lights come in an array of styles, colors, and materials, making them suitable for any decor theme. Whether you prefer modern minimalism, rustic charm, or vintage elegance, there’s a pendant light that will complement your space beautifully. You can easily switch out different styles to refresh your decor whenever you like.
Choosing the Right DIY Pendant Light
Selecting the perfect pendant light for your space involves a few considerations:
1. Consider the Room Size
The size of the room will determine the scale of the pendant light you choose. In larger rooms, opt for bigger pendant lights or multiple fixtures to ensure adequate lighting. In smaller spaces, choose compact designs that won’t overwhelm the room.
2. Height of the Ceiling
Ceiling height is another critical factor. For high ceilings, consider longer pendant lights or those with adjustable heights. Conversely, for lower ceilings, opt for flush-mount or shorter designs to avoid creating an obstruction.
3. Lighting Purpose
Think about what you want to achieve with your lighting. Are you looking for ambient light to fill the room or task lighting for specific areas, such as over a dining table or kitchen island? This will influence the type of bulbs and brightness levels you choose.
4. Material and Style
The material and design of your pendant light should match your overall decor style. For a modern look, consider metals like brass or matte black finishes. For a more traditional feel, glass or wood elements can add warmth and character.
How to Install Your DIY Pendant Light
Installing a DIY pendant light is a quick and easy process. Here’s a step-by-step guide to help you get started:
Step 1: Gather Your Tools
Before you begin, make sure you have the following items on hand:
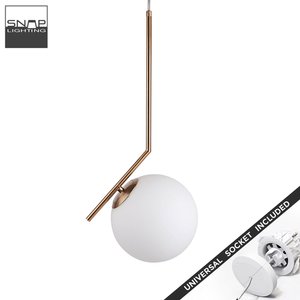
- Your DIY pendant light fixture
- A universal socket (included with your Snap Lighting purchase)
- A ladder or step stool (if needed)
- A power outlet nearby
Step 2: Remove Existing Fixtures
If you’re replacing an existing light fixture, start by turning off the power at the circuit breaker. Carefully remove the old fixture by unscrewing it from the ceiling. Make sure to take down any mounting brackets that are no longer needed.
Step 3: Install the Universal Socket
Install the universal socket that comes with your Snap Lighting pendant. This socket connects all Snap Lighting products and ensures a secure fit. Follow the included instructions for installation, which is typically a straightforward process.
Step 4: Hang the Pendant Light
Once the universal socket is securely installed, it’s time to hang your new pendant light. Simply plug in the pendant light to the universal socket. Depending on the design, you might need to adjust the height to achieve your desired look.
Step 5: Turn On and Enjoy
After everything is securely in place, turn on the power at the circuit breaker and test your new pendant light. Adjust the position as necessary, and enjoy the fresh new look it brings to your space!
Maintenance Tips for Your Pendant Lights
To keep your DIY pendant lights looking their best, consider these maintenance tips:
- Regular Cleaning: Dust and dirt can accumulate on light fixtures, diminishing their brightness. Wipe down your pendant lights regularly with a soft cloth to maintain their shine.
- Bulb Replacement: If you notice a bulb is dimming or not working, replace it with a new one of the same type and wattage. Consider using energy-efficient LED bulbs for a longer lifespan and lower energy costs.
- Check Connections: Periodically check that all connections are secure, especially if you notice any flickering or inconsistent lighting.
Why Choose Snap Lighting?
At Snap Lighting, we pride ourselves on offering high-quality, Australian-designed lighting solutions that make your home improvement projects easy and enjoyable. Our DIY pendant lights come pre-wired and ready to install, allowing you to transform your space without the need for professional help.
Contact Us Today!
For more information about our range of DIY pendant lights, visit https://www.snaplighting.com.au/ today!
- Email: info@snaplighting.com.au
- Location: Vermont (Melbourne), Victoria, Australia
- Facebook: https://www.facebook.com/snaplighting
- Instagram: https://www.instagram.com/snaplighting/
- LinkedIn: https://www.linkedin.com/company/snap-lighting/
- YouTube: https://www.youtube.com/@snaplighting
DIY pendant lights offer an excellent opportunity to enhance your home’s lighting without the stress of complex installations. With their affordability, versatility, and style, they’re the perfect choice for any homeowner looking to elevate their space. Discover the ease of DIY lighting with Snap Lighting and light up your life today!